Trusted by professional contractors across North America for 20+ years. Request a Quote →

Ram Board's Complete Floor Protection Guide for Contractors

Everything professional contractors need to know about temporary floor protection — from selecting the right product for each floor type to installation best practices and coverage calculations.

Get the full PDF guide Contractor's Floor Protection Handbook
Download Free PDF

Choosing the Right Ram Board Product by Floor Type

Different floor types require different protection strategies. Use this guide to match the right Ram Board product to your specific substrate.

Hardwood Floors

✓ Ram Board Standard Roll

Hardwood is the most commonly protected floor type on job sites. The primary risks are scratches from foot traffic and tool drops, moisture from wet trades, and paint or drywall drips.

  • Allow 72+ hours cure time before covering freshly finished hardwood
  • Use Ram Board Seam Tape at all joints to prevent debris intrusion
  • Do not use plastic sheeting — it traps moisture and causes cupping
  • For refinished floors, add Ram Board Underlayment as a buffer layer

Tile & Stone

✓ Ram Board Standard or Heavy-Duty

Tile and natural stone are prone to cracking and scratching. Grout joints are vulnerable to debris intrusion and staining during finishing trades.

  • Wait minimum 48 hours after grouting before applying protection
  • Use Heavy-Duty boards in areas with rolling equipment traffic
  • Tape all seams to prevent grout contamination through joints
  • For polished stone (marble, travertine), use a buffer underlayment first

LVP & Laminate

✓ Ram Board Standard Roll

Luxury vinyl plank and laminate have a wear layer that can be scratched by abrasive debris caught beneath any type of floor covering. Clean surfaces before covering.

  • Sweep floor thoroughly before laying Ram Board — grit causes scratching
  • Do not use high-heat tools over LVP — can cause embossment
  • Tape seams to prevent liquid spills from reaching joints
  • Remove protection every 2-3 weeks for inspection on LVP installations

Polished Concrete

✓ Ram Board + Underlayment

Polished or stained concrete requires special care. The surface is scratch-sensitive and can absorb stains. Protection timing is critical post-polishing.

  • Wait 7 days after final polish before applying any covering
  • Use a non-woven underlayment layer first to prevent micro-abrasion
  • Tape all seams to prevent liquid staining at joints
  • Avoid dragging Ram Board across polished surface during removal

Carpet

✓ Ram Board (carpet-safe application)

When carpet must be protected during finish work, Ram Board lies flat without curling and won't shift during foot traffic. No adhesives that can pull carpet fibers.

  • Lay Ram Board with the printed side up on carpet
  • Use tape only at seams — not to adhere to carpet backing
  • Works best on commercial loop-pile and Berber carpet types
  • Not recommended for high-pile residential carpet installations

Stairs & Treads

✓ Ram Board Stair Protection Kit

Stairs are the highest-traffic and highest-risk area on any construction site. The stair kit provides riser-to-tread coverage that stays in place under constant use.

  • Each kit covers tread face, riser, and nosing for full protection
  • Pre-scored fold lines for accurate installation on standard stair profiles
  • Rated for 6-month installation on residential projects
  • Tape under each tread nose to prevent kick-up during heavy use

Step-by-Step Installation Guide

Proper installation is the difference between protection that holds and protection that fails. Follow these steps for maximum protection performance on every project.

1

Inspect and Sweep the Floor

Before laying any protection, sweep or vacuum the floor thoroughly. Any grit, debris, or nail heads left under Ram Board can cause the very scratching you're trying to prevent. Check for raised fasteners near edges.

2

Confirm Floor Cure Status

Verify that adhesives, coatings, or grouting have fully cured per manufacturer specs. Ram Board is breathable, but covering uncured materials can slow the process. Check moisture readings on wood floors before covering.
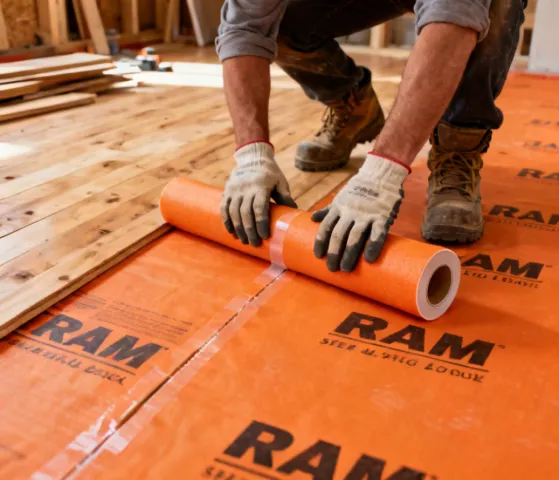
3

Roll Out Ram Board

Unroll Ram Board from one end of the room to the other, printed side up. Roll lengths can be cut to size with a utility knife. Allow 1–2 inch overlap at walls. Stagger seams between rows for added coverage.

4

Tape All Seams and Edges

Apply Ram Board Seam Tape along all joints, overlaps, and perimeter edges. This prevents spills, paint, and grout from penetrating through seams. Tape to the protection itself — never tape directly to finished flooring.

5

Inspect Regularly

Every 2–3 weeks, lift a section and inspect the floor below. Check for moisture buildup, shifting, or damage. Replace any sections that have been compromised. Document your inspections for project records.

6

Remove and Roll Up for Reuse

To remove, lift edge tape first, then carefully roll Ram Board back toward one end. Avoid dragging across the protected surface. Roll up and secure for transport to the next phase or project area.

Ram Board installation process step by step

👋 Pro Installation Tip

When protecting floors near paint or drywall work, extend Ram Board 4–6 inches up the wall and tape in place. This catches drips and overspray before they reach floor level — especially important for baseboard and door trim finishing.

Coverage Reference & Product Selection Table

Use this table to quickly identify the right Ram Board product and estimate the quantity needed for your project.

Product Thickness Roll/Sheet Size Best For Protection Rating
Ram Board Standard 38mil 38" × 100 ft (315 sq ft) Hardwood, LVP, tile, carpet Standard to Heavy Foot Traffic
Ram Board Heavy-Duty 55mil 38" × 75 ft (237 sq ft) High-traffic zones, equipment paths Heavy Equipment Rolling
Stair Protection Kit 38mil Per-tread units (covers 6-8 treads) Stairs, risers, nosings Up to 6 Months In-Place
Ram Board Seam Tape N/A 2" × 164 ft roll Sealing joints and edges Moisture & Debris Barrier
Corner Guard Set 38mil 3" × 3" × 36" L-profile Floor edges, wall bases, transitions Edge & Corner Impact

* Coverage calculations assume 10% waste factor for cuts and overlaps. For irregularly shaped rooms, add 15-20%.

Get the Full 20-Page Contractor's Floor Protection Handbook

Includes full installation protocols, moisture testing guidelines, LEED documentation templates, and a job-site inspection checklist. Free PDF download with your inquiry submission.

Download Free Handbook